Mastering the Art of Applying Thermal Paste: A Step-by-Step Guide for Optimal CPU Cooling

While playing Valorant and Fortnite over the weekend, I noticed frustrating frame drops and occasional performance hiccups that were hindering my gaming experience. As an avid gaming enthusiast, I had built a custom gaming PC with top-tier components, expecting smooth gameplay and breathtaking visuals. However, the sudden spikes in CPU temperatures were taking away the joy of competitive gaming. Determined to resolve this issue, I began researching potential solutions. Through forums and gaming communities, I discovered that improper thermal paste application could be a significant culprit behind thermal issues. It became clear that my gaming PC needed a proper thermal paste upgrade to ensure efficient heat transfer and maintain stable temperatures during intense gaming sessions.
Here is how I resolved my heating and performance issues…
Introduction:
Thermal paste is a critical component in the cooling process of a CPU. It fills microscopic imperfections between the CPU surface and the heatsink, improving the transfer of heat away from the processor. Applying thermal paste correctly can make a significant difference in temperature management and overall system performance. Let’s dive into the step-by-step process of applying thermal paste to your CPU.
-
Step 1: Gather the Required Tools:
Before you begin, ensure you have the necessary tools ready. You’ll need isopropyl alcohol, lint-free cloth or cotton swabs, high-quality thermal paste, and of course, your CPU and heatsink. I used Corsair XTM50 High Performance Thermal Paste Kit
-
Step 2: Clean the CPU and Heatsink:
Thoroughly clean the CPU and heatsink surfaces to remove any existing thermal paste or debris. Apply a small amount of isopropyl alcohol to a lint-free cloth or cotton swab and gently wipe the surfaces until they are clean and dry.
-
Step 3: Applying the Thermal Paste:
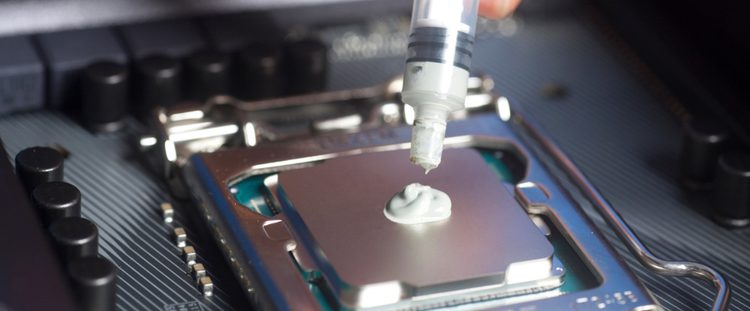
There are different methods of applying thermal paste, but one of the most effective and widely used techniques is the “pea-sized” method. Place a small pea-sized dot of thermal paste (about the size of a grain of rice) at the center of the CPU.
-
Step 4: Spreading the Thermal Paste:
Gently place the heatsink on top of the CPU, making sure the paste-covered area aligns with the processor. Avoid applying excessive pressure. The mounting mechanism should spread the paste evenly across the CPU surface. If you prefer a more controlled application, use a plastic card or spatula to spread the thermal paste evenly in a thin layer.
-
Step 5: Securing the Heatsink:
With the thermal paste evenly spread, secure the heatsink in place according to the manufacturer’s instructions. Ensure it is firmly attached to the CPU, but don’t overtighten the screws, as it may cause damage.
-
Step 6: Double Check for Air Bubbles:
Before completing the installation, double-check for air bubbles between the CPU and heatsink. If any are visible, disassemble and reapply the thermal paste. Air bubbles can hinder proper heat transfer and lead to increased temperatures.
-
Step 7: Final Check and System Assembly:
Once the thermal paste is correctly applied, reassemble your gaming PC. Connect all components and ensure everything is properly seated. Now, you’re ready to power up your system and enjoy the improved cooling performance.
Conclusion:
Properly applying thermal paste to your CPU is essential for maintaining optimal temperature levels and maximizing the performance of your gaming PC. By following the step-by-step guide above, you can achieve a precise and efficient thermal paste application, resulting in better heat dissipation and a cooler-running CPU. Remember, taking the time to apply thermal paste correctly will pay off in the long run, as it helps protect your valuable components and ensures smoother and more enjoyable gaming experiences.